Thursday, October 25, 2012
House of the month!
Madison Magazine has selected our home as November's House of the Month!!!
Be sure to pick up the latest issue to see the article and awesome photos!
You can also read the article online here:
http://www.madisonmagazine.com/Madison-Magazine/November-2012/Eclectic-Excitement/
Thanks for following our progress with us! Please let us know what you think!
Wednesday, August 29, 2012
Curb Appeal
 |
| Before |
Hello Iconiers!!!
So it came time to finally concentrate on the front facade!
The photo above shows the before... the rest of this post will show our progress! We are not yet finished, but sometimes it is helpful to see the working transition from boring to fun.

We started by removing those "not-so-Iconi" shutters and giving the white brick, the trim, and the door some color.

Recognize those "hedges"? They are from our Design MMOCA exhibit. They aren't staying here, you will see them disappear and be replaced as this post goes on. Nothing is set in stone at the Iconi Home. Which, if you've been following, I'm sure you've you realized by now! Its an ever changing process! At this point, the part of our curb appeal that gave us the most trouble is the rock/ mulch area in front of the hedges. If you have any examples of cool landscaping you have done with the front of your house, please share!

We moved our lovely (and now fully functioning) mailbox closer to the door. We are able to lock and (more importantly) unlock it now, so it is finally our main mail receptacle. We tried several different options for what we wanted to put in the corner to right of the door. This was attempt one, but it needed more.

We also tried this two level approach. We liked the height it added, so we took it from there.
This picture provides a good look at the... um...lovely original light fixture. Those won't be around long!


We had this tall black planter, so we traded this for the others we had stacked in the corner and instead spread those three out in front of the front window.

We have plans to beef up the wimpy columns out front with some Charred Wood. We will also put a charred board as a header across the top and add some for detail on the windows. The link gives examples and more information, but it is a really cool process. We will use cedar we found at the Habitat Restore, and basically burn it and then immediately put water on it. This seals it and turns the cedar fireproof as well as giving it a very cool color in grey/silver/black brown tones, or as we like to call it, our favorite Sepia tones!

This planting done along the sidewalk was added earlier in the spring. We like that it softens the hard lines of the concrete!
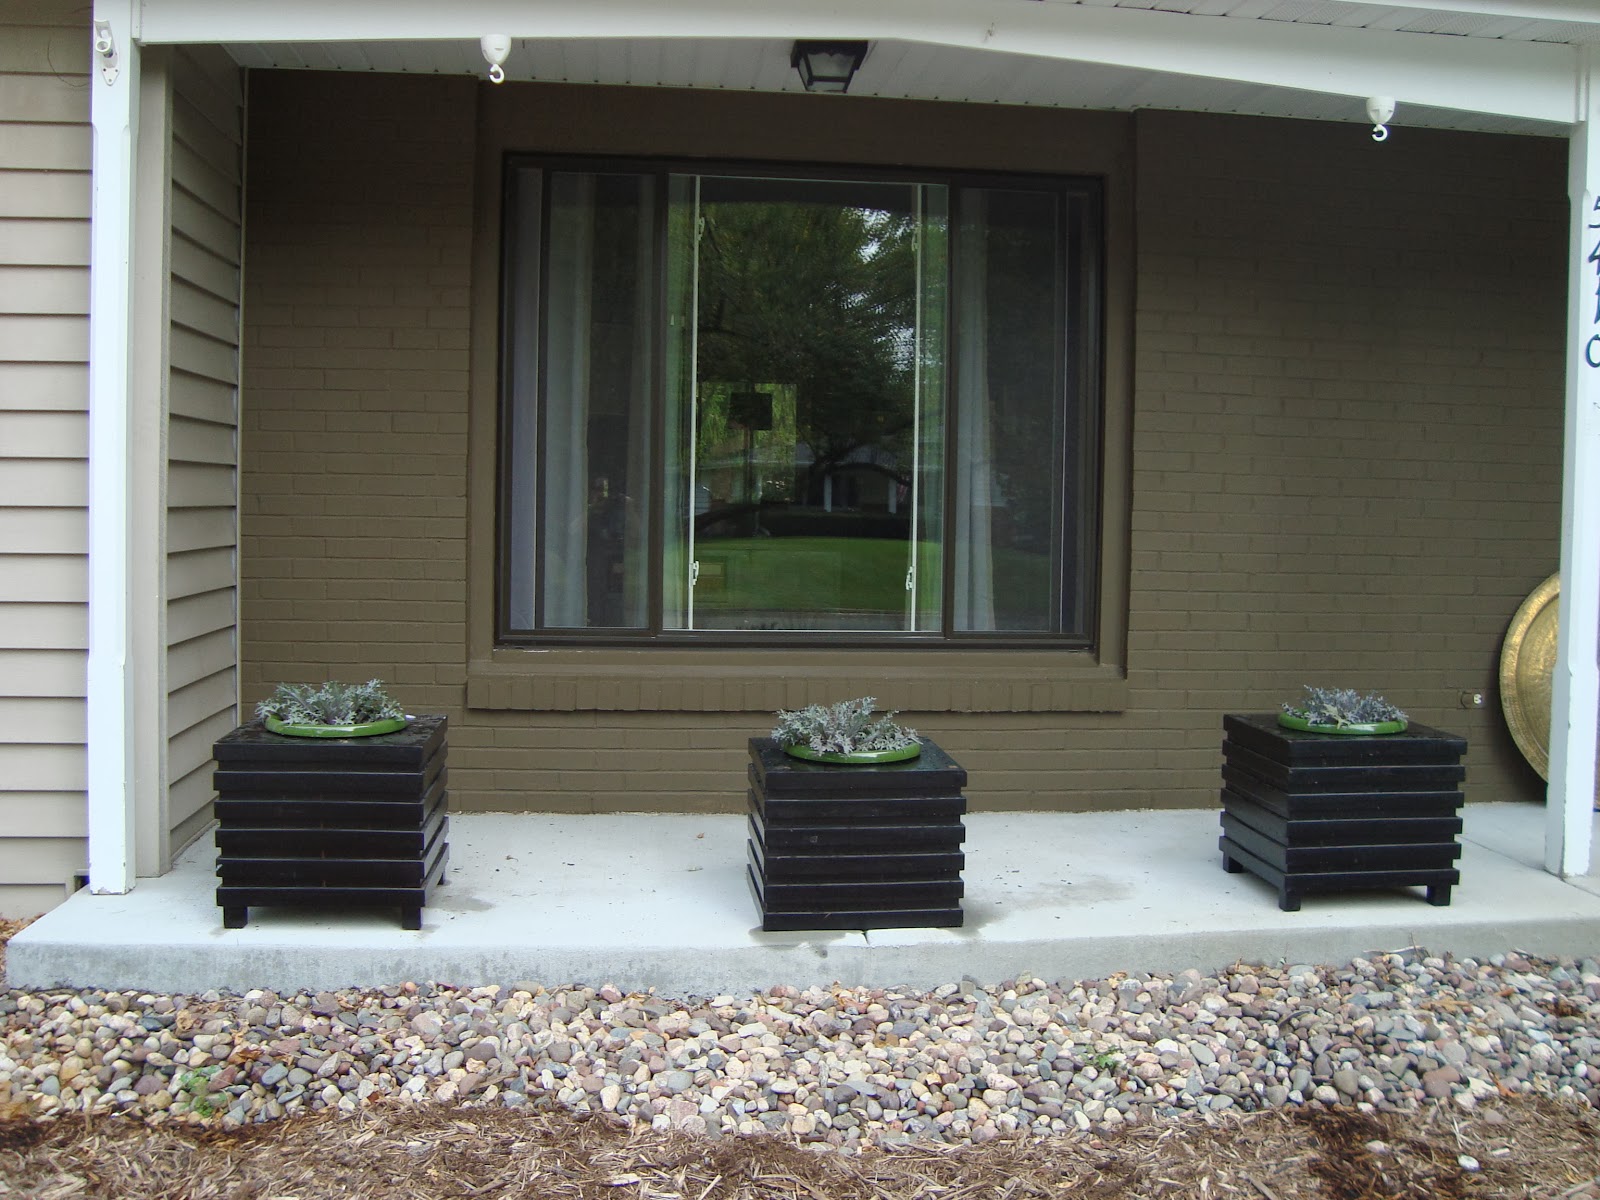
In this photo, the plants are just sitting in the planters. When planted, they will be in full display and not just peeking out, which you will see in the following photos.
The next step was creating a planter to introduce another level and a softer material. The wood becomes a nice contrast against the hard cement and stone.

We filled it with this awesome black mulch!

We then created an organic shape where we had room. Now the sharp angles don't seem as harsh as they once did.

To be continued... with our Charred Wood Front Post!
P.S. Look at our backyard garden grow!


All the fencing on the planters is necessary to keep the bunnies out, otherwise they can just hop up there even though they are 2' tall. Everyone loves the garden including them, and as we recently found out, the chipmunks!
While the bunnies' plans have been thwarted, we found a chipmunk sneaking his way out of the planter with full cheeks the other day. Based on what has been nibbled on; tomatoes, cilantro,... we think they are putting together some really great salsa for their next fiesta!
While the bunnies' plans have been thwarted, we found a chipmunk sneaking his way out of the planter with full cheeks the other day. Based on what has been nibbled on; tomatoes, cilantro,... we think they are putting together some really great salsa for their next fiesta!
Apparently our parsley planter also doubles as a nursery! Look who we found the other day.

Thursday, June 28, 2012
The Master Bathroom!

When we first moved into this house we staked out this room as the future master bedroom .We had always talked about having a walkout deck off the master bedroom at our prior home.
We knew we were going to have to make a lot of changes to it, as well as transform the bathroom next to it into a master bathroom and make the deck more private, so we moved into the house's then current master bedroom for the time being. We had priorities, and the kitchen most definitely came before the master bedroom. (if you look back at the kitchen you can easily see why).
Well now, its time has come! This post is about the master bathroom. Next week we will move into the bedroom.
What the bathroom used to look like:

and
What the bathroom looks like now:
What the bathroom looks like now:


So here's what we did!
First of all we messed with the floor plan a tad. In the above picture you see the wall drops back and we placed a cabinet there. There used to be a built in cabinet or should I say a nook with shelves and a pressure rod. Believe me it wasn't anything exciting... made evident by our lack of photos of it. Besides the one of it going away:
First of all we messed with the floor plan a tad. In the above picture you see the wall drops back and we placed a cabinet there. There used to be a built in cabinet or should I say a nook with shelves and a pressure rod. Believe me it wasn't anything exciting... made evident by our lack of photos of it. Besides the one of it going away:

We just dropped back into the master bedroom to both straighten the wall and give us more space in the bathroom. And that is now where a gorgeous cabinet sits!
The cabinet started as this:

We found this gem at the comfy chair consignment.
We transformed it to this...

We painted it to give our find an old look that worked with the bathroom and the rest of the house. The glass was given a distressed mirror coating so that you can no longer see through the panes, but they still feel lighter in the room than a solid door.


For the entrance to/from the master bedroom from the bathroom, we took an amazing vintage door and applied the same distressed mirror finish to it. It is mounted on the bedroom side with the same sliding hardware we used in the living room. We love the sliding doors when you need a door but do not want it swinging into your space it is clean and gives a modern feel.


This wall/ door is the one bumped out and replaced.

Here is the view of the door installation and hardware from the bedroom.
Oh so pretty!!!
Our swivel towel hooks are super cool.
It brings a little spice of modern/industrial into the mix.

The vanity was made from two vintage nightstands with a GORGEOUS piece of granite called "sueded Nambe" to top it off.


Progress shot!
Awesome lines, plenty of storage, and amazing hardware to boot!
Awesome lines, plenty of storage, and amazing hardware to boot!
We replaced the floor was a perimeter glue vinyl from Armstrong.

The shower became bigger than the last one. It used to end where you see the wall end in the photo above. We bumped it out, and in the space we acquired, were able to add a shelf and a bench in beautiful tile work.
Stay tuned for updates on the bedroom!
We are almost done! Isn't this exciting? You will be able to get another look at our house in the November Issue of Madison Magazine when we are featured as house of the month!!!
We are almost done! Isn't this exciting? You will be able to get another look at our house in the November Issue of Madison Magazine when we are featured as house of the month!!!
Stay cool today!
Hopefully you will tell us what you think of our progress as you type from your air conditioned room!
Saturday, June 16, 2012
Where's the rain?
Welcome to our garden update!


Our raised beds now complete with headboards for the climbing beans and cucumbers! A bed isn't complete without a headboard! Your pillows would fall off, or in this case, our beans! We can't spill the beans!!!!


Look at our garden grow!

We have an eclectic collection of pots and old galvanized steel wash tubs by the patio to bring some more greenery and flowers in.

These lovely plants in mulch create some nice lines along the outside of the solarium.


We added bamboo shades to the structure behind the grill to enclose the area a little more. Since they are just shades though, I can pull them up to make a quick exit!

This is my little dripping fountain that creates a very soothing background noise, and apparently makes a pretty great squirrel bubbler! A squirrel was hanging upside down just drinking away from the leaf! I wish I had been quick enough to take a photo!

To the front of the house we go! Some landscaping has been added along the front walkway and along the side of the yard. Keep an eye on how the grass will just keep disappearing...(not too fond of grass)


Our cool "new" mailbox we don't have a key for yet! Thankfully our mail technician has stopped putting our mail in it until we can get that taken care of. Its a good thing I have little arms to reach in there!
Stay tuned for master bedroom/bathroom updates! (For sure this week!!!)
Saturday, May 19, 2012
So Here's the Dirt
It has been awhile since the last post, but we have accomplished a lot! I attended the High Point market for the store (be sure to stop in and see some cool new stuff!), we put out a beautiful exhibit for Design MMOCA, and on top of all that we have been working on the house!
In only seems fitting that on the hottest day of the year to date that we should head outside to blog about the backyard.
Let's take a look at some before shots: Well.. before-ish. We don't have shots before any of our furniture was out there, but you'll still see the process.


 So here is the deck after the stain. Wow! What a difference! It looks like black walnut I LOVE it!! I found a stainless sink and counter on one of our shopping trips and I wanted to get it for the area to the right of the grill... but hubby said I was nuts! Ok, so maybe it was 12 feet long... I will keep hunting for the perfect one to add at some point. Things just seem to work out.


In only seems fitting that on the hottest day of the year to date that we should head outside to blog about the backyard.
Let's take a look at some before shots: Well.. before-ish. We don't have shots before any of our furniture was out there, but you'll still see the process.

This is the view from the dining room window. The furniture is from our old house.
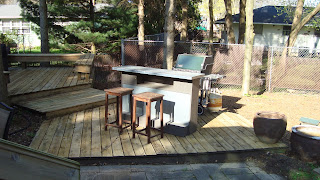
We started with the bar and the grill area in this space, but when you are having a nice dinner with friends, who wants to look at the back yard? So we moved things around to connect the two areas: dining in and dining out. Manger à l'intérieur et de manger en plein air!
We started with the bar and the grill area in this space, but when you are having a nice dinner with friends, who wants to look at the back yard? So we moved things around to connect the two areas: dining in and dining out. Manger à l'intérieur et de manger en plein air!

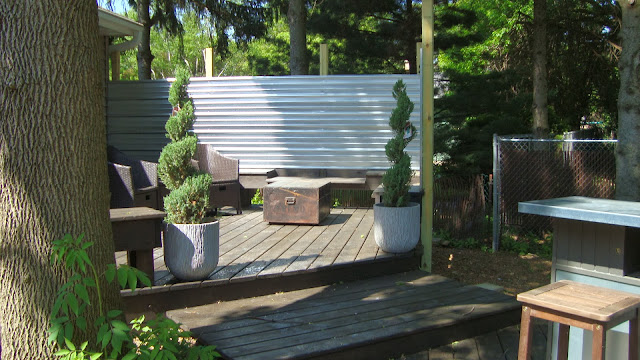
This is the view from the [future] master bedroom/ upper level deck.
The future vegetable garden will be straight back from this view. After we tracked the sun, we are sure that the location is perfect for a bountiful vegetable garden.

In this shot you can see part of the table and chairs (on the left) from the first picture. That window is the dining room window and the doors on the right of the house lead into the [future] master bedroom.

Grill and Bar on the second level deck platform.We plan on having a patio screen built behind the grill to clean it up and define the area.

We have always wanted a little walk out deck off our master bedroom. I was thinking that this house has everything (or will have everything) that I wanted in my last house that I couldn't have then. I have this, I'll have an awesome master bedroom, I have a raised bed garden...
Here is an "in progress" shot of that raised bed garden being constructed in the backyard.

We will use the tin platforms that the mossed pots sat on at Design MMOCA to create a cool element for the iron trellis "arch" entrance to our garden.

This is the left of the yard. It needs lots of work but I have a thought, or should I say a few, I get a little sleepy thinking about it.
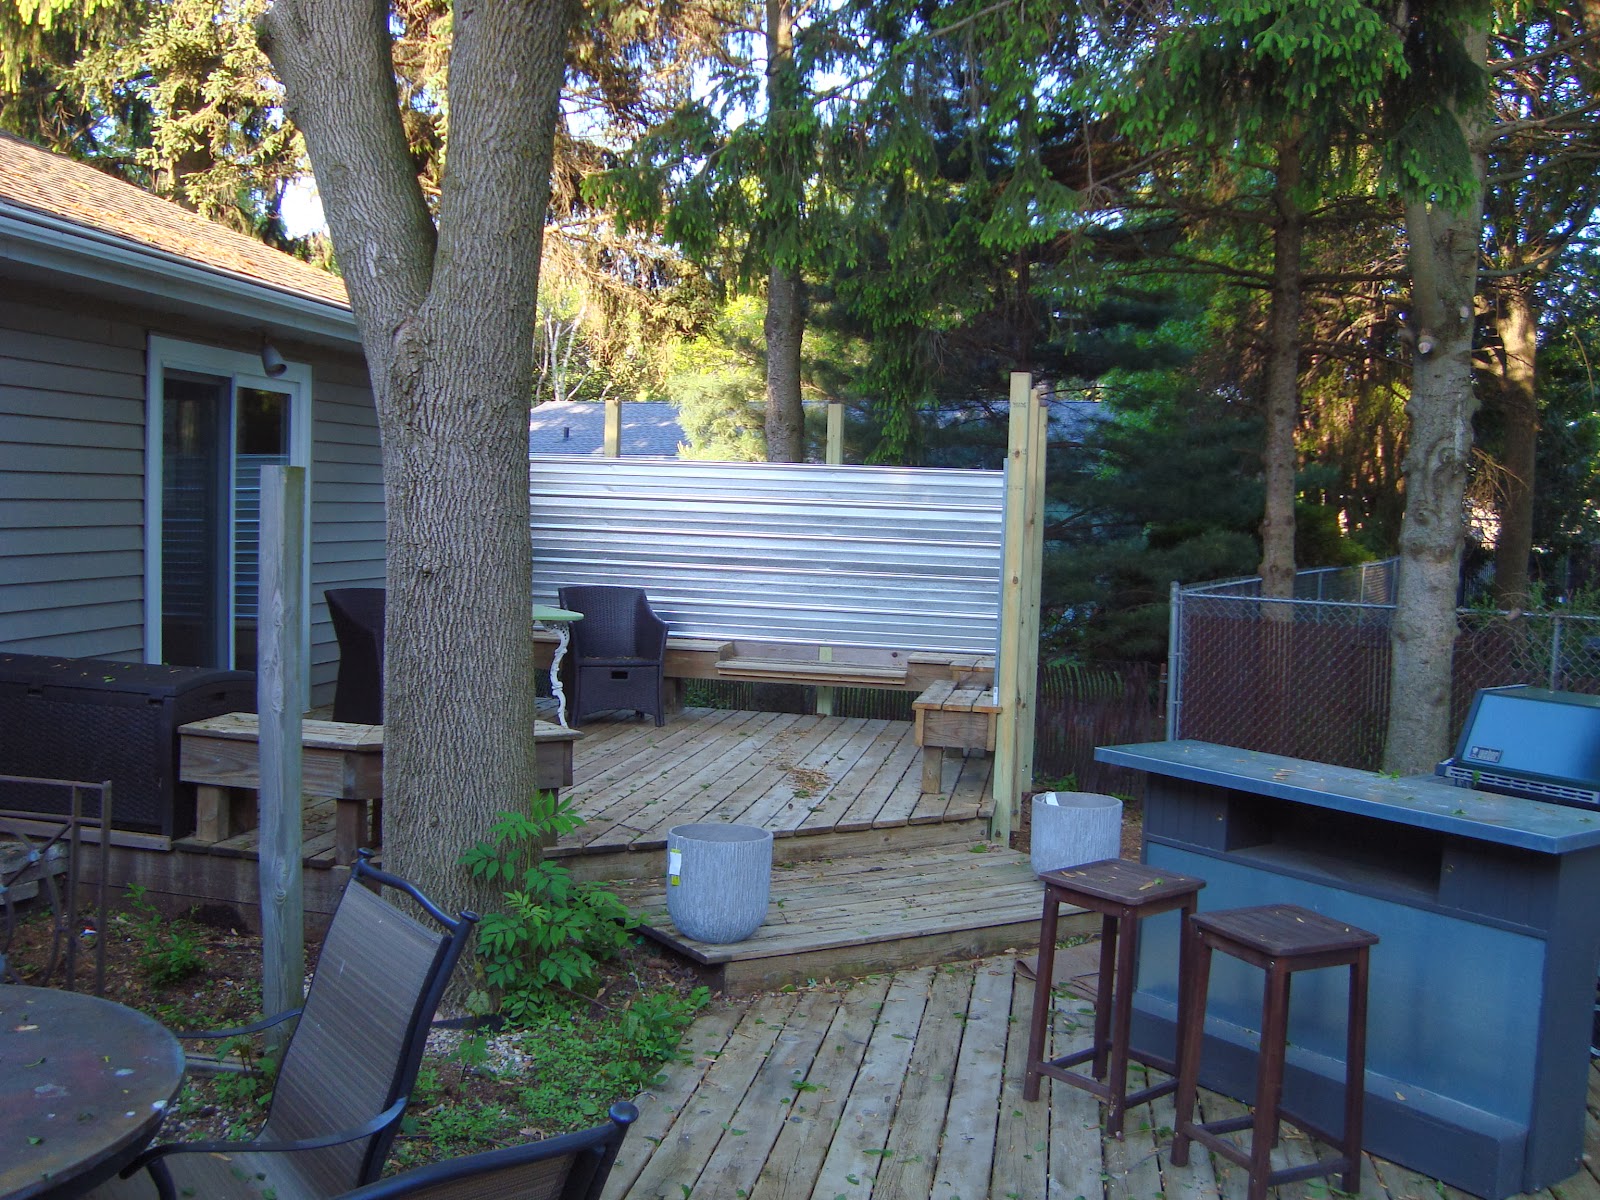
We made the master bedroom deck more private by adding these sheets of galvanized roofing. Just the thought of being able to go out on the deck in my PJ's and have my coffee sounds fabulous! Maybe I should put a clock out there so I am not late for work; I could easily lose track of time.
We also changed the built-in benches slightly. We recessed parts of the bench so that outdoor cushions could fit in nicely and look more custom and of course more comfy. It was also a little tall to begin with. We are far from giants over here.

This is the deck pre-stain after the power washing. I love the power washer it makes outdoor clean up so easy. We picked up some wonderful translucent Sherwin Williams deck stain and transformed it!


So here's the dirt!

We had a whopping 12 yards of dirt delivered to put into my raised beds in the garden. Of course it was delivered to a pile in my front yard leaving me to find a way to get it to the back. I could hire someone for this for $500, but $500 can go a long way. We decided we needed to do the labor ourselves this time.
My dad was very concerned. He proposed that I go stock up on brats at the local grocery store sale and invite my friends to help with the promise of food. However, my friends don't move dirt, they hire people to move dirt. We were going to have to man up and figure it out.
My dad was very concerned. He proposed that I go stock up on brats at the local grocery store sale and invite my friends to help with the promise of food. However, my friends don't move dirt, they hire people to move dirt. We were going to have to man up and figure it out.
My dad's next great idea was too fill up 5 gallon buckets with dirt, load them onto my tractor trailer and dump them into the beds after driving them to the back. And that is what we did!
I started with the 12x4 bed since it was the biggest. Getting that bad boy done would motivate me, and then the others would not seem so bad. Remember, if you think this seams like lot, I did too until I thought about it as one bucket at a time. I also did it at 7 am so it was cool and peaceful and then when I get home at 7 pm, so again, even cooler!!! I also had my buddy Johnny help too when I went to work on Friday!


Dirt. Dirt. Dirt.
And my dad didn't think I would have enough!
We will either wait for rain or get it wet so that it will compact and I can start planting some vegetables pronto! I was saying I was going to miss the Monona farmers' market this year, but I will have a little market of my own! (And I will probably still visit it anyway)
What do you think?

We want the ground in the garden to be pea gravel. At least that is the plan for now. We will kill the grass and do either that, or maybe some sort of ivy ground cover. Did you know that laying wet newspaper on the grass and covering it with mulch is a natural grass killer? Well that's a thought, we could do mulch... but I kind of don't want mulch. Well, the verdict is still out, all we know for the moment is that it won't be grass, I purposely made it so you can't get a lawnmower in there, I didn't want grass. I'm not too fond of grass. It's bd for the environment among other things... Hmmm, what do you think of peat moss?

The beds are faced with that same steel that we used up on the deck by the master bedroom. We also made a ledge to sit on out of reclaimed barn wood my dad had in his shed.

Garden gems just waiting to grow!

I came across this wonderful piece from an Author Court Aluminum Table. The table is so sculptural to begin with that, without the top, it makes a beautiful sculpture for the garden.

We needed to give you a quick shot of the front; our wonderful "grass hedges" from Design MMOCA make an appearance. :) And don't worry, we are far from finished here!
Please let us know what you think! Do you have any good vegetable garden tips to share?
Have a wonderful weekend!
-Iconi
-Iconi
Subscribe to:
Posts (Atom)